Wanderer and Conventional Built-up Modifications
During the building process, I tried a number of 'modifications' on the wing, fuse, and tail to improve performance. What I found was that the following modifications were most helpful in improving the flyability of the Wanderer and could definitely be applied to other models of this type as well. These modifications are so helpful that they make the Wanderer into quite a nice, floater-type, but speedy slope plane too. You can get nice pseudo-axial rolls and some inverted flight characteristics out of this plane with the modifications. Having a two-piece wing is really helpful too, especially with a two-seater car with a small trunk.
Stringers
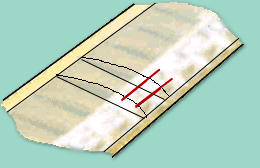
The figure to the right illustrates "stringers", (showing only 2 ribs in the picture, but you may want to do most of the whole wing, except [maybe] the wing tips):
 I added what I called 'stringers' to the area of leading edge between ribs. These stringers help
improve the consistency (I think) of the airfoil on the wing, especially because it eliminates a
lot of the 'covering sag' that occurs between ribs. I've used different sizes and wood types, but what works probably best is to use strips of balsa 1/8" square.
I used to slot the wing ribs before gluing them into
the wing by stacking up all the ribs, pinning them together and cutting 2 slots on the upper surface of the rib (just enough to hold the stringer) all the way down
the stack of ribs.
It helps to do all the ribs at the same time (i.e. both wings). Where should the slots go? I dunno, I never measured. I've built some
with only 1 strip, but 2 seems to be better. If you put in 2, put them equally spaced between the leading edge of the wing, and the thickest
part of the airfoil.
Semi-Full Flying Rudder
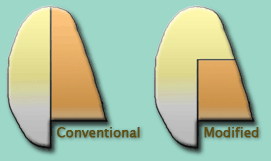
The figure on the left illustrates this:
 I improved the rudder effectiveness by 'slotting' the upper section of the non-movable part (the fin) of the rudder
and attached it to the moving part. This gives more surface area to the rudder without having to increase the overall
size of the vertical stabilizer. With this change, the Wanderer can roll considerably better and do some of the most amazing
things on the slope. So much so that you'd think that there were ailerons on the wing.
Try it, I think you'll like it!
Wing Rods, or a 2-piece wing
I built the wing in 2 pieces with 2 steel (piano) wire rods and brass tubes built into the wing roots. This allows the wing to be broken down into 2 three foot long wing panels so that you can actually get it to fit in the trunk of your car. These days, I'd probably use carbon fiber wing rods instead of steel as the carbon rods are about an ounce lighter, but only if you can afford $10-14 per foot cost. I used to choose one rod slightly larger than the other as, really, only one rod of about 3/16" in diameter is necessary, the 2nd rod just serves to keep the wing halves aligned.
